Experimental principle
Tumor angiogenesis is an extremely complex process, which generally includes steps including vascular endothelial matrix degradation, endothelial cell migration, endothelial cell proliferation, endothelial cell tube branching to form a vascular ring, and formation of a new basement membrane. Regardless of the primary tumor or the secondary tumor, angiogenesis occurs once the growth diameter exceeds 1-2 mm. This is because tumor cells themselves secrete a variety of growth factors that induce angiogenesis. Most malignant tumors have dense angiogenesis and rapid growth. Therefore, angiogenesis plays an important role in the development and metastasis of tumors. The inhibition of this process will obviously prevent the development and spread of tumor tissues.
In vitro angiogenesis experiments can mimic the angiogenesis of tumors and are suitable for studying the effects of drugs on this process. We take HUVEC cells as an example to introduce the detailed process of this experiment.

Figure 1 angiogenesis micrograph
I. Materials and Experimental Methods
1. Experimental Materials
1. Experimental Materials

2. Experimental method:
2.1 Introduction to the experimental process
2.1 Introduction to the experimental process
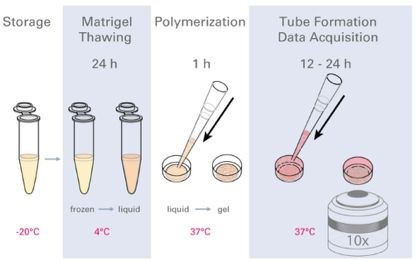
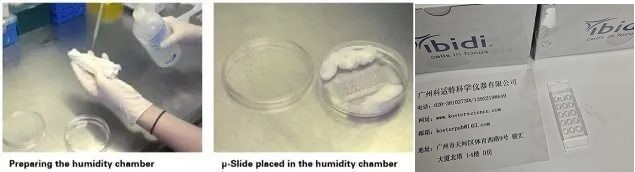
Figure 2 Experimental flow chart
(Matrigel is melted in advance and placed in the lower hole of the ibidi angiogenic slide. After gelation, the cell suspension is added to the upper hole of the angiogenic slide, and the tube is observed and observed under a microscope.)
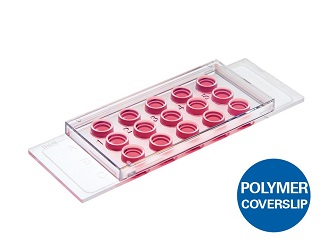
2.2 Introduction to consumable structure
2.2 Introduction to consumable structure
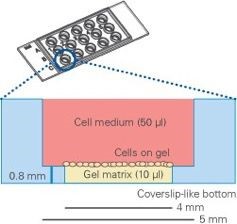
Figure 3. Schematic diagram of longitudinal section of an angiogenic slide (Matrigel is placed in the lower hole, the cells are spread on Matrigel, and the upper well is filled with medium)
2.3 Data Analysis Process Introduction
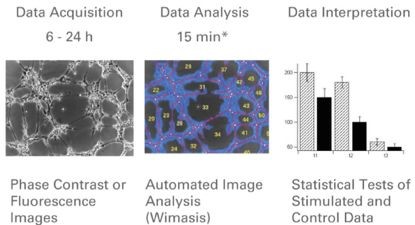
Figure 4. Flow chart of experimental results collection and analysis (images were taken at specific time points, and image analysis (Wimasis fully automated analysis) was performed to measure the length of the tubules, the number of loops, the area covered by the cells, and the nodes. Then the statistics were measured. Analysis to illustrate the results of the experiment.)
II. Experimental Procedure
1. Prepare matrigel
1). Place Matrigel in an ice box one day before the experiment and put in 4. C refrigerator, so that the glue can slowly melt overnight. (Note: Also prepare some 4. C pre-cooled tips for pipetting Matrigel)
2). Keep Matrigel in the ice box before starting the experiment.
3). Open the sterilization package and remove the ibidi angiogenesis slide.
4). Add 10 μl of Matrigel to each well. Note that the tip of the gun should be placed perpendicular to the inner hole to prevent Matrigel from flowing through the upper hole leaving residual glue.

Because Matrigel is not very fluid, and it is possible that the pipette is not accurate, it is possible to inject 10μl of glue, but it can not fill the lower hole of the angiogenic slide - this will inevitably affect the imaging results of the experiment.
How to determine if a suitable volume of Matrigel has been added :
We only need to use a piece of checkered paper to know how much the pipette can adjust to fill the hole.
II. Experimental Procedure
1. Prepare matrigel
1). Place Matrigel in an ice box one day before the experiment and put in 4. C refrigerator, so that the glue can slowly melt overnight. (Note: Also prepare some 4. C pre-cooled tips for pipetting Matrigel)
2). Keep Matrigel in the ice box before starting the experiment.
3). Open the sterilization package and remove the ibidi angiogenesis slide.
4). Add 10 μl of Matrigel to each well. Note that the tip of the gun should be placed perpendicular to the inner hole to prevent Matrigel from flowing through the upper hole leaving residual glue.
Because Matrigel is not very fluid, and it is possible that the pipette is not accurate, it is possible to inject 10μl of glue, but it can not fill the lower hole of the angiogenic slide - this will inevitably affect the imaging results of the experiment.
How to determine if a suitable volume of Matrigel has been added :
We only need to use a piece of checkered paper to know how much the pipette can adjust to fill the hole.
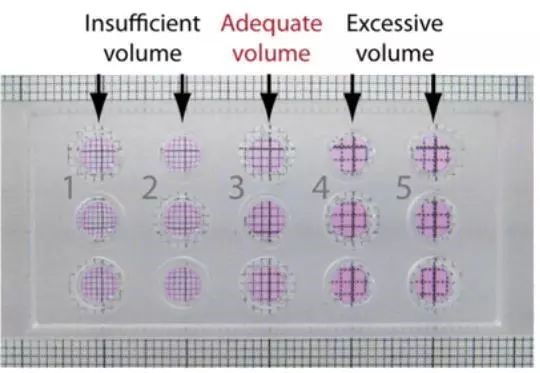
As shown in the above figure, look at the grid paper below through each hole vertically. If the grid is reduced, it means that the glue is not full, the grid is enlarged, then the glue is added, and the lattice is not deformed. It is just the state of filling the hole.
2. Gel
1). Cover the lid of the ibidi angiogenesis slide.
2) Prepare a 10cm Petri dish and put it into a wet paper towel to make a wet box.
3). Place the ibidi angiogenesis slide into a Petri dish and close the Petri dish cover.
4). Put the whole culture dish into the incubator and let it stand for about 30 minutes, waiting for the gel to settle.
5). Wait while preparing the cell suspension.
3. Spreading cells <br> The amount of cells added directly affects the results of the experiment, so pre-experimental experiments are performed on different types of cells and quantities before the start of the formal experiment. Obtain the optimal ratio of cell density. Our experiments today use HUVEC cells with 10,000 cells per well.
1) Prepare a cell suspension with a density of 2*105 cells/ml and mix well.
2) Remove the ibidi angiogenic slide from which the gel has solidified from the wet box.
3). Add 50 μl of cell suspension to each well, taking care to keep the tip perpendicular to the upper well and do not touch the gel of the lower well. A row of guns can be used.
4). Also check with a checkered paper to add a sufficient amount of liquid, if not, add cell-free medium to make the upper liquid just fill up.
5). Cover the lid and let it rest. After a while, all the cells will sink to the surface of Matrigel.

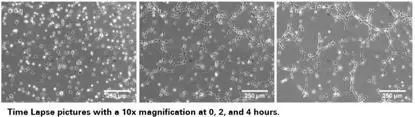
4. Collect images and count results
Images can be collected at regular intervals according to the growth rate of the cells, and the tube length, coverage area, number of loops, number of nodes are measured and recorded, and statistical analysis is performed thereon.
Images can be collected at regular intervals according to the growth rate of the cells, and the tube length, coverage area, number of loops, number of nodes are measured and recorded, and statistical analysis is performed thereon.
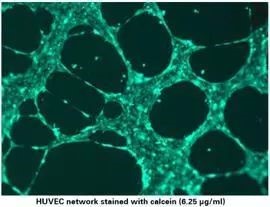
5. Immunofluorescence staining
Immunofluorescence staining can be performed on the tube formation results as needed.
1) Carefully remove the medium from the upper well, taking care not to touch the gel or cell network.
2). Add 50 μl of calcein (12.5 μl calcein stock 1 μg/μl) diluted in serum-free medium to a final concentration of 6.25 μg/ml (1:160).
3) Incubate for 30 minutes at room temperature in the dark.
4). Wash three times with PBS. Note that PBS should be slowly added to the upper well to avoid impacting the cells.
5). Immunofluorescence imaging was performed using 485 nm / 529 nm.
Experimental advantage
1. This experimental method can save more matrigel and reduce the cost of experiment;
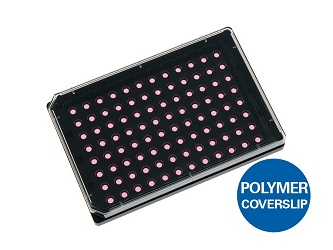
2. The ibidi angiogenesis slides in the upper and lower holes can remove the concave surface and make the imaging effect better.
1. This experimental method can save more matrigel and reduce the cost of experiment;
2. The ibidi angiogenesis slides in the upper and lower holes can remove the concave surface and make the imaging effect better.
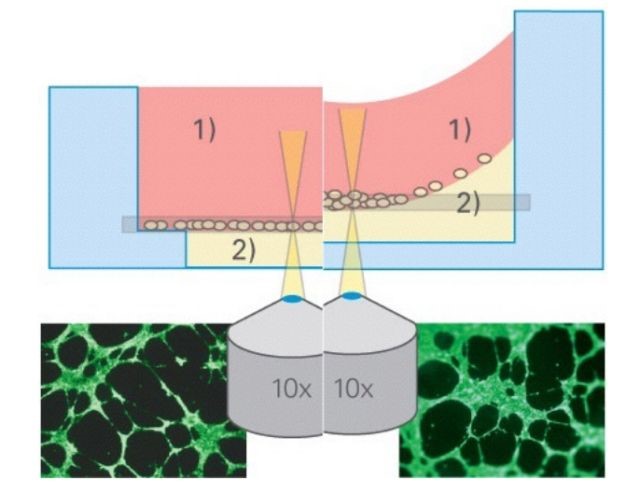
(The left ibidi angiogenesis slide has no concave surface, and the entire field of view is clearly visible; the right 96-well plate has a concave liquid surface, and the middle is clearly blurred.)

 |  | |
 |  |  |
High Quality Butyl Rubber Tape
1. Features of our High Quality Butyl Rubber Tape
a. Self adhesive , it has super strong adhesive.
b. It is high temperature resistant, -40 ~ 110 degree C resistant.
c. It is waterproof.
d. Durable, service life is 3~5 years for outdoor use.
e. Easy to operate, just peel off the liner, install it to the construction surface directly, no need fire roasting and glue. It will adhere to the surface perfectly at once.

Butyl Rubber Tape,butyl aluminum foil rubber tape,aluminum butyl rubber tape,Butyl sealing tape,butyl rubber adhesive tape
Kunshan Jieyudeng Intelligent Technology Co., Ltd. , https://www.jerrytape.com